Instrumenting Next.js with runtime secret injection
Leveraging the instrumentation feature in Next.js 14 to inject secrets into applications at runtime.
 Photo by EJ Strat
What's an Instrumentation File?
Instrumentation is a new feature introduced in Next.js 14 that allows you to run custom logic when your application starts.
The instrumentation.ts/js file lives at the root of your Next.js project and exposes a register() API, which will be called once when a new Next.js server instance is initiated.
Instrumentation is most often used to initiate logging or telemetry services. This example from Vercel's docs shows a basic example of how this works:
//instrumentation.ts
import { registerOTel } from '@vercel/otel'

export function register() {
  registerOTel('next-app')
}
In this example, the register() function initializes OpenTelemetry for the Next.js application.
Instrumenting with Secrets
As we've seen, the register() API is meant primarily for running code at startup and initializing services or tools that can be used later during application runtime. This lends itself nicely as a way to inject secrets into our app. We've discussed the benefits of runtime secret injection, specifically in the context of Next.js in a previous post, so have a look at that if you want to know more. The TL;DR is that it keeps secrets out of code, version control, and build artifacts. Runtime secret injection also makes your application more portable and easier to distribute, either within your team or for public consumption.
Why not just use a .env file?
Next.js evaluates (server-side) secrets and environment variables at runtime, if provided as a .env file. While this works, it comes with a number of drawbacks, security concerns, and clumsy DX. We've covered this topic in-depth in another post, but in short, .env files are problematic because they often end up in version control or left lying on local disks unencrypted, increasing the risk of a secret leak. They're nearly impossible to manage securely at scale, are difficult to distribute across a team, and offer no access control or security. Secret management tools offer encryption, access controls, easy collaboration, auditing, and rotation, making them a much safer, scalable, and developer friendly solution.
So let's take a look at how we could use the instrumentation file to inject secrets from a secrets management tool into our Next.js application at runtime.
The Setup
We're going to bootstrap a fresh Next.js project, add an instrumentation file to it, and use a secrets management service to inject secrets into our app at runtime.
I've bootstrapped a Next.js application using npx create-next-app@latest and the following options:
[email protected]
Ok to proceed? (y) y

✔ What is your project named? … instrumentation-demo
✔ Would you like to use TypeScript? … Yes
✔ Would you like to use ESLint? … Yes
✔ Would you like to use Tailwind CSS? … Yes
✔ Would you like your code inside a `src/` directory? … No
✔ Would you like to use App Router? (recommended) … Yes
✔ Would you like to use Turbopack for `next dev`? … Yes
✔ Would you like to customize the import alias (`@/*` by default)? … No
In this example, we'll be using Phase to inject secrets into our app, but this approach can be adapted to work with any secret management service, such as AWS Secrets Manager, HashiCorp Vault, or even a custom solution.
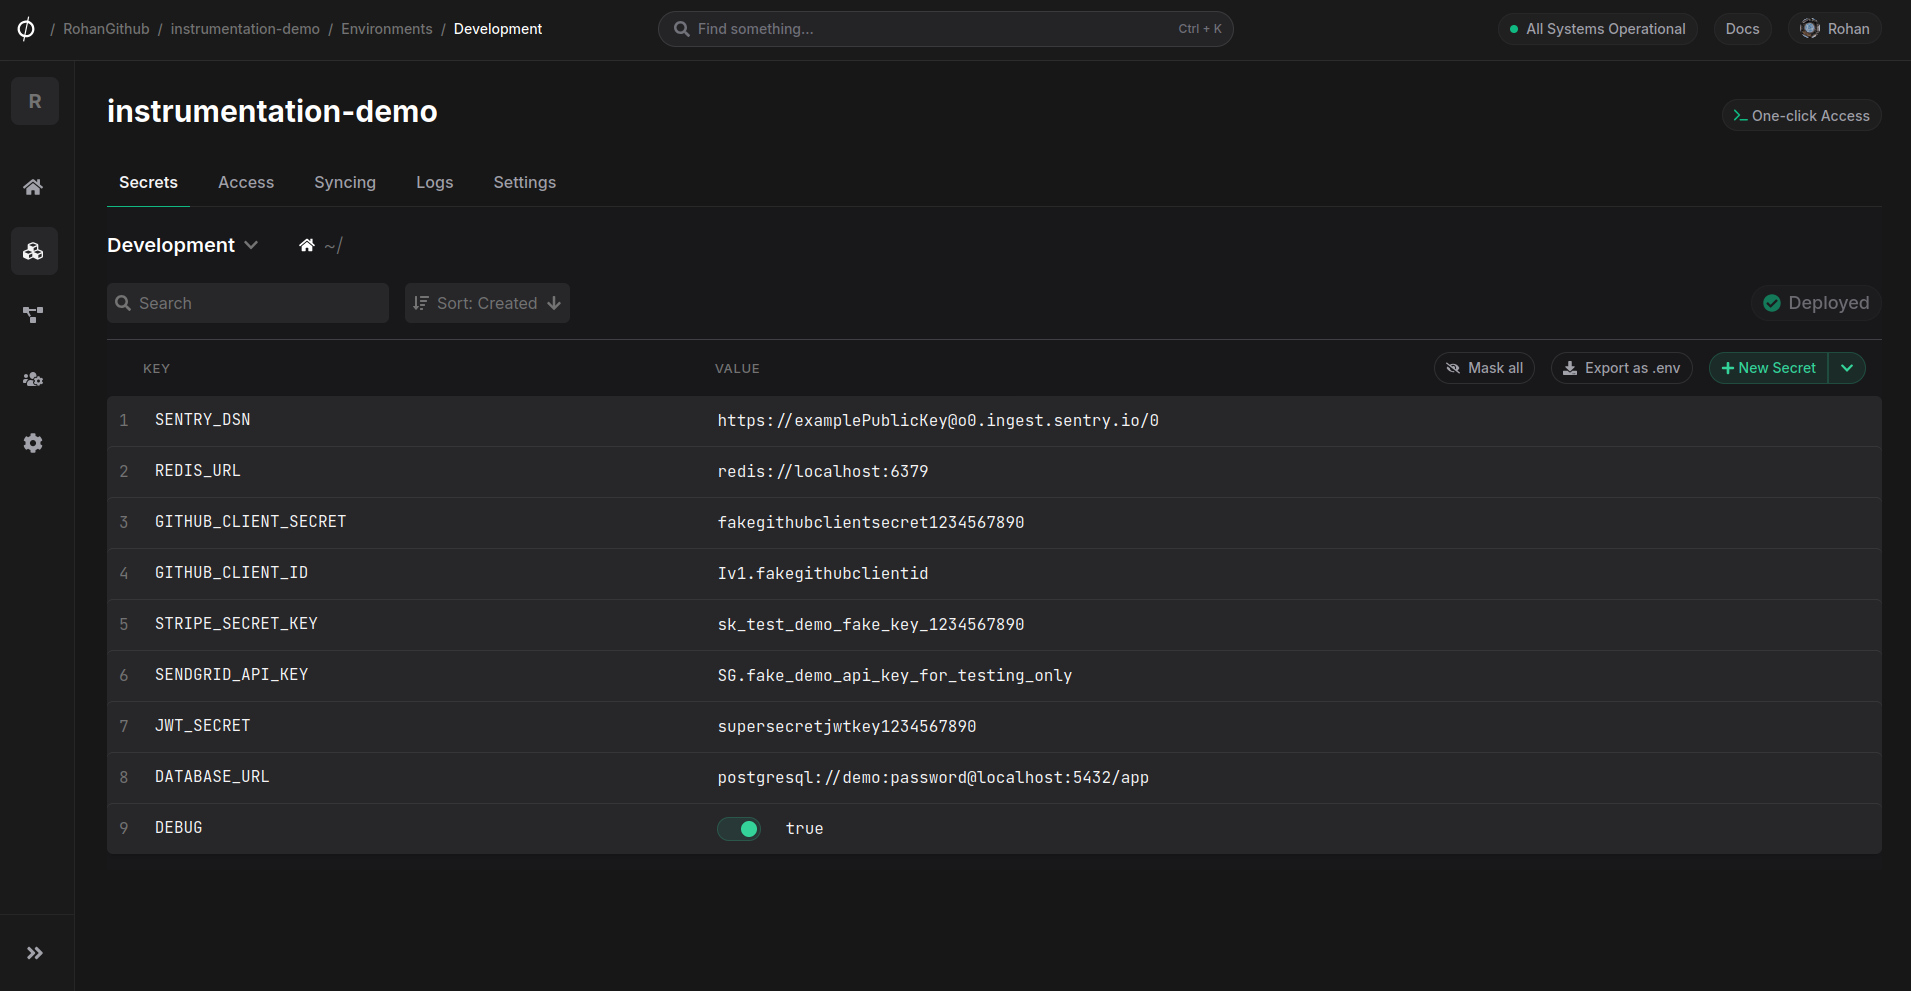
For this demo, I've created an app on Phase called instrumentation-demo with some dummy secrets:
Step 1: Create the Instrumentation File
Create a new file called instrumentation.ts at the root of your Next.js project. This file will contain the logic to fetch and inject secrets into your application. If your project uses a different folder structure, such as a src directory, you can place the file there. Check out the Next.js instrumentation documentation for more details.
> tree -L 1

├── app
├── eslint.config.mjs
├── instrumentation.ts 👈
├── next.config.ts
├── next-env.d.ts
├── node_modules
├── package.json
├── package-lock.json
├── postcss.config.mjs
├── public
├── README.md
└── tsconfig.json
In our file, we will export a function called register() that will be called when the Next.js server starts. We'll leverage this function to fetch secrets from Phase and inject them into the global scope, making them accessible throughout our application. For now, let's just add a console.log() to make sure it's being called correctly when our app starts up:
// instrumentation.ts
export function register() {
  console.log('Hello world!')
}
Start Next.js with npm run dev and we can verify that our instrumentation file is working:
▲ Next.js 15.4.2 (Turbopack)
   - Local:        http://localhost:3000
   - Network:      http://192.168.0.197:3000

 ✓ Starting...
 ✓ Compiled instrumentation Node.js in 13ms
 ✓ Compiled instrumentation Edge in 41ms
Hello world!
 ✓ Ready in 1069ms
Note: Instrumentation only runs when the Next server starts, so if you're using next dev, you will need to stop and restart the server to see changes in your instrumentation file.
Step 2: Fetching secrets
Now let's fetch some secrets inside our register() function. Since we're using Phase, we could either use the Node SDK or the REST API. We'll use the API here, which should make it easier to adapt this solution if you're using a different secrets management platform.
Since we're awaiting fetch(), we'll make our register() function async, and define the URL, params, and headers for our API call. I'm referencing my Phase API Token from an environment variable called PHASE_API_TOKEN, which in this case is stored in a .env file, but could come from any source, such as a CI/CD environment variable or a secrets management service.
Then we'll do a simple fetch() to get secrets from Phase, and log them to the console.
// instrumentation.ts
export async function register() {
  const url = new URL('https://api.phase.dev/v1/secrets/');
  const token = process.env.PHASE_API_TOKEN;

  const params = {
    app_id: 'cc42e50a-5db4-4dee-ae64-907f84972918',
    env: 'development',
  }

  const headers = {
    Authorization: `Bearer ${token}`,
  };

  const res = await fetch(url + '?' + new URLSearchParams(params), {
    method: 'GET',
    headers,
  });

  const data = await res.json();

  console.log(data)
}
Start up our app again with npm run dev, and we can verify that secrets are being fetched and logged to the console:
▲ Next.js 15.4.2 (Turbopack)
   - Local:        http://localhost:3000
   - Network:      http://192.168.0.197:3000
   - Environments: .env

 ✓ Starting...
 ✓ Compiled instrumentation Node.js in 13ms
 ✓ Compiled instrumentation Edge in 19ms
[
  {
    id: 'f0827c27-6724-45fc-9bf9-6c9f0e032f57',
    key: 'DEBUG',
    value: 'true',
    comment: '',
    tags: [],
    override: null,
    path: '/',
    keyDigest: '2779a0e8fabfa668cae18994abe67a38a9fef59bece99dc2ef8f22fe4de58fb6',
    version: 1,
    createdAt: '2025-07-19T10:25:14.705260Z',
    updatedAt: '2025-07-19T10:25:14.705282Z',
    environment: 'c9df4ecd-b0d9-45f9-9e99-63ad252496c3',
    folder: null
  },
  {
    id: 'd48116aa-3d72-47fd-8c97-e559a33a85b4',
    key: 'DATABASE_URL',
    value: 'postgresql://demo:password@localhost:5432/app',
    comment: '',
    tags: [],
    override: null,
    path: '/',
    keyDigest: '192f1d88b1c2576b78657dfecbf45a2a2540fb2912c1c3003d32c4511c0d1217',
    version: 1,
    createdAt: '2025-07-19T10:25:14.850605Z',
    updatedAt: '2025-07-19T10:25:14.850621Z',
    environment: 'c9df4ecd-b0d9-45f9-9e99-63ad252496c3',
    folder: null
  },

  ......


]
 ✓ Ready in 1754ms
Step 3: Access secrets in our app
Now we're fetching secrets when our app starts up, but we need to make them accessible to application code. There are a few different ways to do this. For this demo, we'll use a global object which we'll access as globalThis.
First, let's set an empty secrets Record in global. Next, we'll update our code to loop through the response data, and populate globalThis.secrets with the key/value pairs from our API response:
// instrumentation.ts

declare global {
  var secrets: Record<string, string>; // 👈 We'll hold secrets here
}

export async function register() {
  globalThis.secrets = {}; // 👈 initialize with an empty object

  const url = new URL('https://api.phase.dev/v1/secrets/');
  const token = process.env.PHASE_API_TOKEN;

  const params = {
    app_id: 'cc42e50a-5db4-4dee-ae64-907f84972918',
    env: 'development',
  };

  const headers = {
    Authorization: `Bearer ${token}`,
  };

  const res = await fetch(url + '?' + new URLSearchParams(params), {
    method: 'GET',
    headers,
  });

  // 👇 Check for response errors
  if (!res.ok) {
    console.error(`Failed to fetch secrets: ${res.status}`);
    return;
  }

  const secrets = await res.json();

  // 👇 Loop through the response and grab the key + value of each secret
  for (const secret of secrets) {
    if (secret.key && secret.value !== undefined) {
      globalThis.secrets[secret.key] = secret.value; // 👈 Set key / value pair
    }
  }

  console.log('Secrets loaded:', Object.keys(globalThis.secrets)); // 👈 Log the secret keys from global
}
Stop and re-start the app with npm run dev, and we should see our secret keys, this time from global.secrets
▲ Next.js 15.4.2 (Turbopack)
   - Local:        http://localhost:3000
   - Network:      http://192.168.0.197:3000
   - Environments: .env

 ✓ Starting...
 ✓ Compiled instrumentation Node.js in 14ms
 ✓ Compiled instrumentation Edge in 19ms
Secrets loaded: [
  'DEBUG',
  'DATABASE_URL',
  'JWT_SECRET',
  'SENDGRID_API_KEY',
  'STRIPE_SECRET_KEY',
  'GITHUB_CLIENT_ID',
  'GITHUB_CLIENT_SECRET',
  'REDIS_URL',
  'SENTRY_DSN'
]
 ✓ Ready in 1765ms
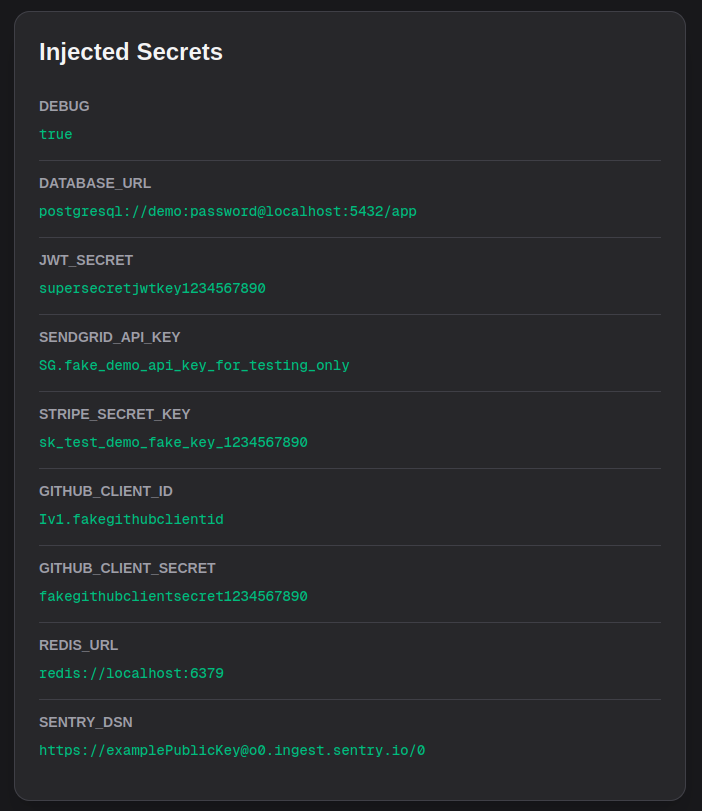
Now, we can access these secrets via globalThis anywhere in our app. I've added the following in my app/page.tsx to read and display these secrets:
// app/page.tsx

export default function Home() {

  const secrets = globalThis.secrets ?? {};

  return (
    <main className="min-h-screen bg-zinc-900 text-zinc-100 p-8">
      <div className="max-w-2xl mx-auto bg-zinc-800 shadow-xl rounded-2xl p-6 border border-zinc-700">
        <h1 className="text-2xl font-semibold mb-4 text-zinc-100">Injected Secrets</h1>

        {Object.keys(secrets).length === 0 ? (
          <p className="text-zinc-400">No secrets loaded.</p>
        ) : (
          <ul className="divide-y divide-zinc-700">
            {Object.entries(secrets).map(([key, value]) => (
              <li key={key} className="py-3">
                <div className="text-sm text-zinc-400 font-semibold">{key}</div>
                <div className=" text-emerald-500 mt-1 rounded py-1 font-mono font-medium text-sm break-all">
                  {value}
                </div>
              </li>
            ))}
          </ul>
        )}
      </div>
    </main>
  );
}
Opening the app in my browser at http://localhost:3000 shows my secret keys and values rendered on the page:
Global secrets? Really?
If you're anything like me, seeing secrets in global has been making you uncomfortable as well. While these global secrets are only available within the Node.js runtime of our Next.js server (an improvement over standard environment variables by the way, which are readable by any process on the host machine), you may still want to expose these secrets in a more controlled way. There are various alternatives to this approach, but a full exploration of these is beyond the scope of this post and will depend a lot on the specifics of your application configuration. A couple of ideas to get you started are either writing the secrets to a temporary file on disk, or creating a shared module-local cache to hold your secrets:
// lib/runtime-env.ts

let secrets: Record<string, string> | undefined;

export function setRuntimeEnv(newSecrets: Record<string, string>) {
  secrets = newSecrets;
}

export function getRuntimeEnv(key: string): string | undefined {
  if (secrets) return secrets[key];

  return undefined;
}
In the example above, you can call setRuntimeEnv() in your instrumentation file to set the secrets, and use getRuntimeEnv() to access them in your application code. This way, you avoid polluting the global scope with secrets, while still making them accessible throughout your app.
What about client-side environment variables?
This is a contentious and complicated issue, and even Vercel doesn't seem to have a standard solution to fit all use-cases. As we've discussed in a previous post, Next.js inlines NEXT_PUBLIC_ environment variables at build-time, which means they are not evaluated at runtime and can't be changed without rebuilding your app. There are a number of workarounds and hacks to get around this limitation, but they all come with trade-offs.
In my opinion, the best approach is to avoid using environment variables with the NEXT_PUBLIC_ prefix altogether, and instead pass these variables as props from server to client components. Set up your client components to accept the required values as props:
// app/_components/ClientComponent.tsx

"use client"; // 👈 this is a client component

export default function ClientComponent({
  value,
}: {
  value: string;
}) {

  return (
    <li className="py-3">
      <div className="text-sm text-zinc-400 font-semibold">CLIENT COMPONENT VALUE</div>
      <div className=" text-red-500 mt-1 rounded py-1 font-mono font-medium text-sm break-all">
        {value}
      </div>
    </li>
  );
}
And then pass the value from your server component to the client component when rendering it:
// app/page.tsx
import ClientComponent from "./_components/ClientComponent";

export default function Home() {
  const secrets = globalThis.secrets ?? {};

  const clientValue = secrets.GITHUB_CLIENT_ID; // 👈 env var to pass to client component

  return (
    <main className="min-h-screen bg-zinc-900 text-zinc-100 p-8">
      <div className="max-w-2xl mx-auto bg-zinc-800 shadow-xl rounded-2xl p-6 border border-zinc-700">
        <h1 className="text-2xl font-semibold mb-4 text-zinc-100">
          Injected Secrets
        </h1>

        {Object.keys(secrets).length === 0 ? (
          <p className="text-zinc-400">No secrets loaded.</p>
        ) : (
          <ul className="divide-y divide-zinc-700">
            {Object.entries(secrets).map(([key, value]) => (
              <li key={key} className="py-3">
                <div className="text-sm text-zinc-400 font-semibold">{key}</div>
                <div className=" text-emerald-500 mt-1 rounded py-1 font-mono font-medium text-sm break-all">
                  {value}
                </div>
              </li>
            ))}

            <ClientComponent value={clientValue} /> //👈 pass as prop
          </ul>
        )}
      </div>
    </main>
  );
}
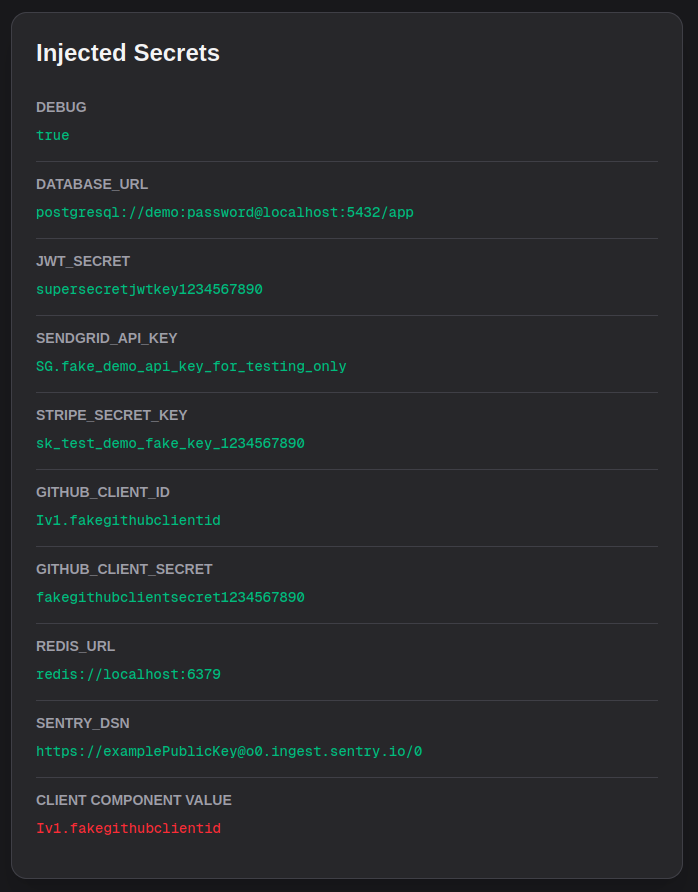
This approach ensures that your client-side components receive the necessary values without relying on build-time environment variables, and you also get the added benefit of deliberately passing only the values that are needed, rather than exposing all environment variables to the client.
If you have a large number of client-side variables, or a complicated component tree, you could also consider using a context provider to pass these variables down the tree instead of prop drilling.
Conclusion
In this post, we've explored how to use the instrumentation file in Next.js 14 to inject secrets into our application at runtime. By leveraging the register() function, we can fetch secrets from a secrets management service like Phase and make them available throughout our app.
This approach keeps secrets out of code, version control, and build artifacts, making our application more secure and portable.
If you're using a different secrets management service, you can adapt the code to use it's API or SDK. The key takeaway is that the instrumentation file provides a powerful way to run custom logic at application startup, making it an ideal place for runtime secret injection.
Further Reading
If you're interested in learning more about Next.js instrumentation, secrets management, or runtime secret injection, here are some resources to check out:


