End to End encrypted secrets deployment to Kubernetes
Securely deploying secrets to Kubernetes with Phase
Introduction
Kubernetes is the open-source container orchestration platform of choice for many, specifically for automating deployment, scaling, and management of containerized applications. Supplying secrets securely to these containerized applications with Kubernetes can be tricky, but it's essential to the security of your workload. Out of the box, Kubernetes offers several native mechanisms to handle secrets, but they come with limitations in terms of security features, scalability, and complexity.
In this guide, we will explore enabling encryption at rest for secrets stored in Kubernetes and use the Phase Kubernetes Operator to securely sync secrets stored in the Phase secrets manager to a Kubernetes cluster. If you don't know what an operator is, think of it as an agent running inside a Pod in a Kubernetes cluster that interacts with the Kubernetes API to automate the management of a certain service or a set of services.
Here's what the high level architecture looks like:
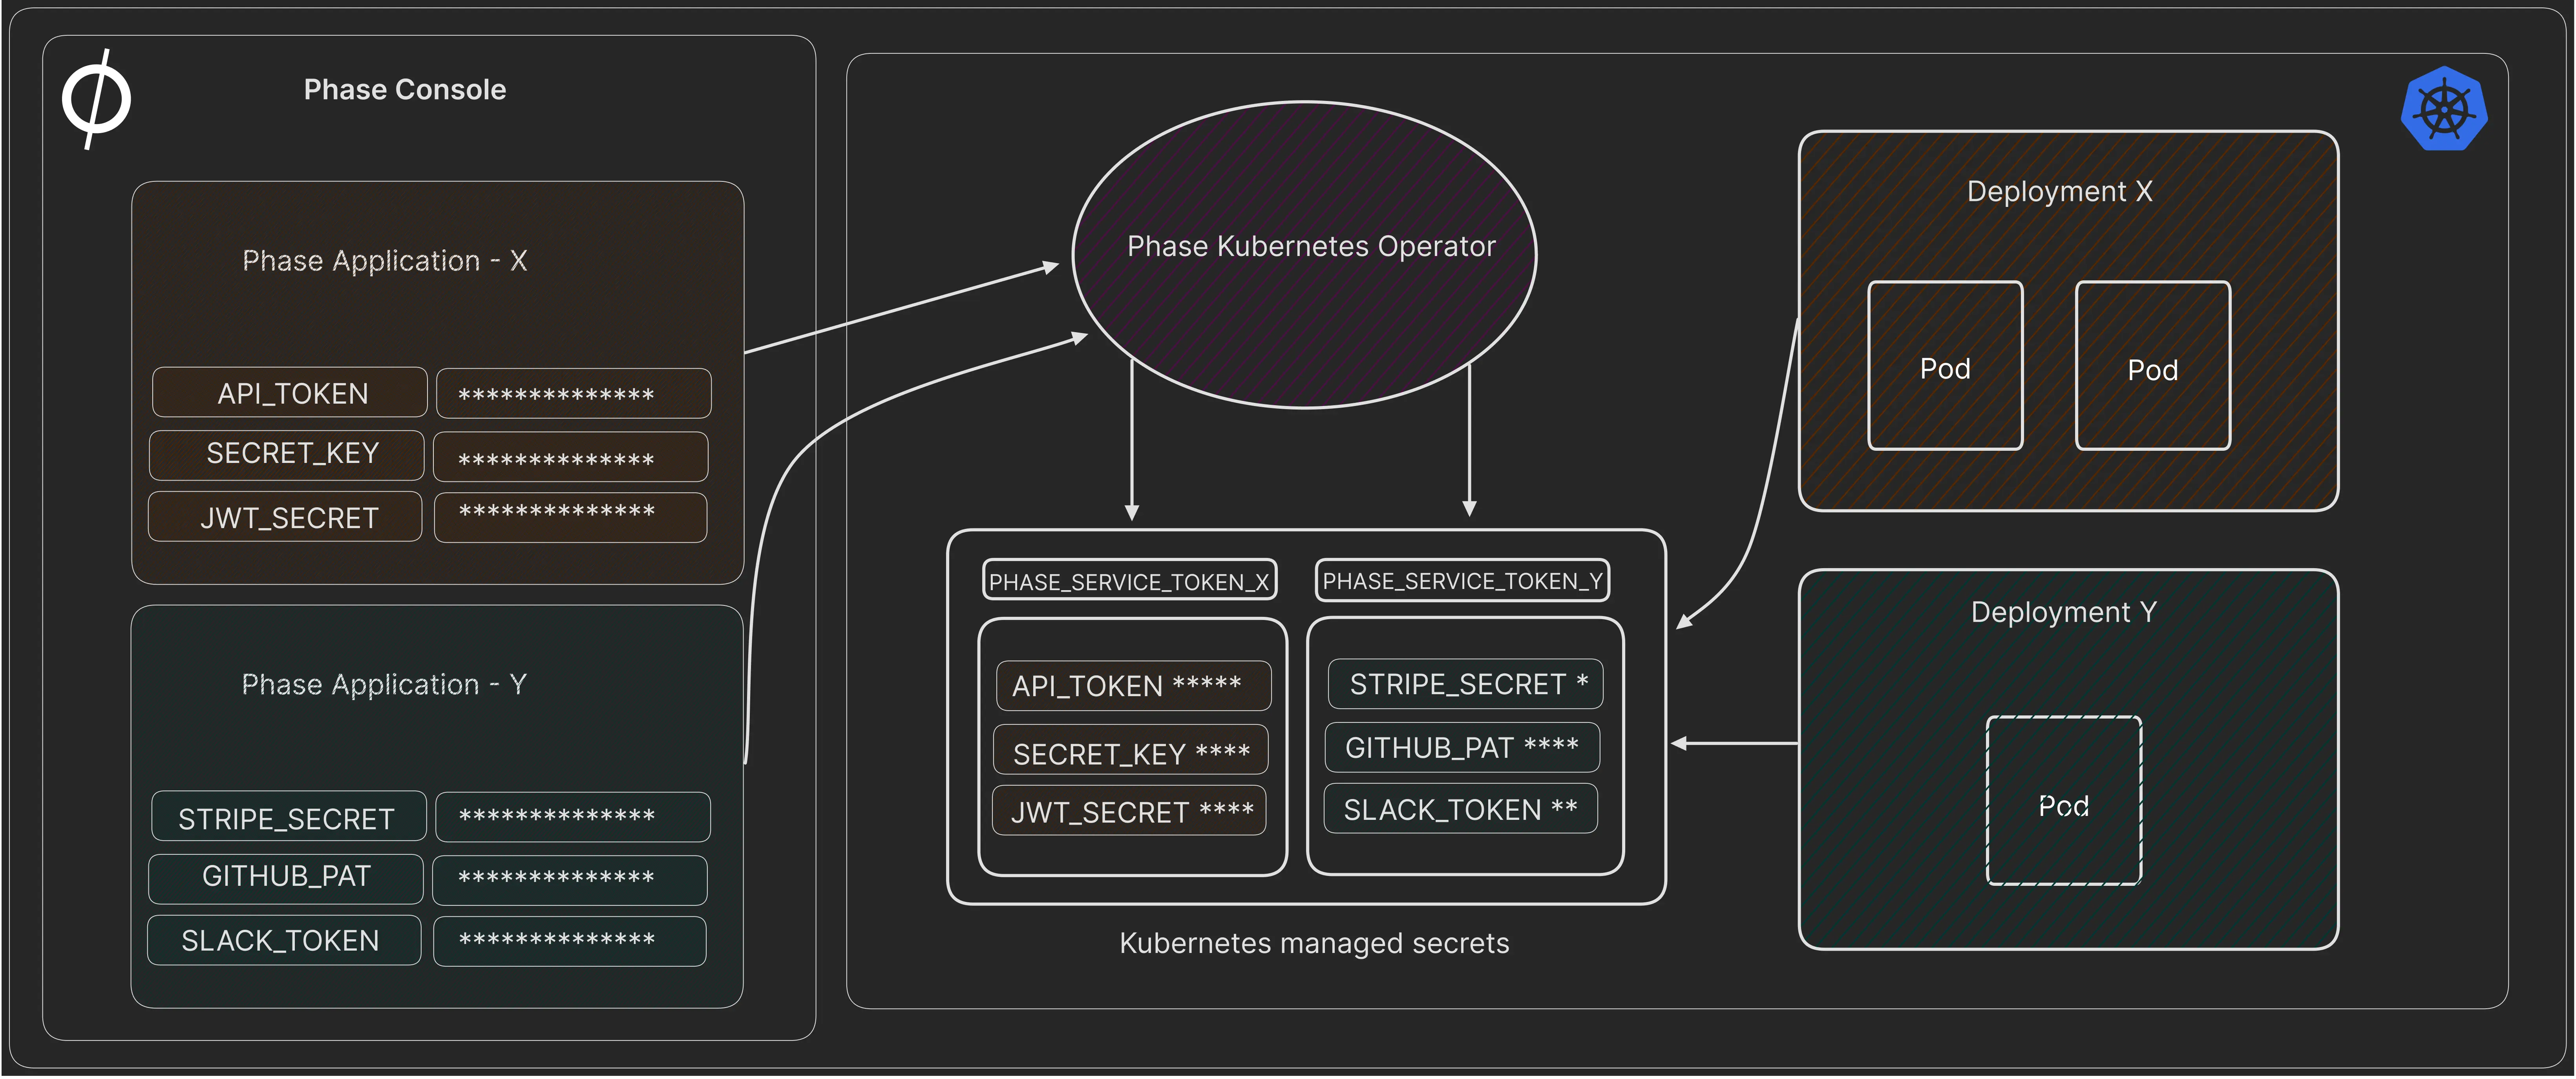
The Phase Kubernetes Operator will fetch application secrets from a Phase instance, decrypt them, and write them to a Kubernetes cluster as a managed Kubernetes Secret. It will then continue to watch for any changes in secrets in Phase and automatically sync them with the Kubernetes cluster, making our secret manager the source of truth for secrets. Furthermore, it can optionally automatically re-deploy Kubernetes deployments once a secret associated with them has been changed.
Phase can also be used to manage secrets in stages preceding application deployment in the cloud, such as local development or a when a container is being built in CI pipelines like GitHub Actions, but that's outside the scope of this blog.
Understanding the security of secrets stored in Kubernetes etcd
Before we begin, let's make sure our Kubernetes cluster has 'encryption at rest' enabled. Kubernetes uses etcd, a distributed key-value pair database to store critical data such as the state of the cluster, configuration and secrets. It's important that the Kubernetes API encrypts the secrets before they are written to etcd on disk.
There is a saying, "encryption is easy, key management is hard"; here we face the same challenge. If we want to encrypt secrets that are stored inside our Kubernetes cluster, which key would we encrypt that data with? Isn't that another secret we need to protect? The complexity of this setup varies depending on how your cluster is managed. If you are managing your Kubernetes cluster by yourself, the process can be complex given that you will have to manually create, deploy, and manage the key that is used to encrypt etcd data on all master / master standby or control plane nodes. Although this may be tedious, this approach has security benefits if your threat model requires you to maintain self-custody of your keys.
On the other hand, if your cluster is managed by a cloud provider like AWS, GCP or Azure, encryption of etcd data is setup by default with the keys owned and managed by the cloud provider.
With managed Kubernetes you also have the option to leverage the respective cloud provider's KMS (Key Management Service) to create and use an encryption key that will be managed by you but owned by the provider. This is usually easier to set up but requires you to trust the cloud provider's KMS service with your keys and can end up being quite expensive as the keys are often priced by the number of invocations.
So to recap, there are two main options for encrypting secrets at rest in Kubernetes etcd:
- Local Key Storage: Offers protection against
etcdcompromise but not host compromise, as keys are stored on the host. Most suitable for self-managed Kubernetes clusters. - Managed KMS Key Storage: Leverages envelope encryption and enhances security by not storing the key encryption key in Kubernetes. This will most likely be the default option if you have a managed Kubernetes cluster on larger cloud providers like AWS, GCP, Azure etc.
Encryption provider considerations
Kubernetes facilitates encryption through various providers, each with distinct attributes and trade-offs:
| Name | Encryption | Strength | Speed | Key Length | Note |
|---|---|---|---|---|---|
| Default - identity | None | N/A | N/A | N/A | Writes resources without encryption. Acts as a decryptor when set as the first provider. |
| aescbc | AES-CBC with PKCS#7 padding | Weak | Fast | 32-byte | Vulnerable to padding oracle attacks. Key material is accessible from control plane host. |
| aesgcm | AES-GCM with random nonce | Must be rotated every 200,000 writes | Fastest | 16, 24, or 32-byte | Advisable only with an automated key rotation scheme. Key material is accessible from control plane host. |
| kms v1 (deprecated) | Envelope encryption with DEK per resource. | Strongest | Slow | 32-bytes | Uses AES-GCM for data encryption and configurable KMS for key encryption. Supports simple key rotation. |
| kms v2 | Envelope encryption with DEK per API server. | Strongest | Fast | 32-bytes | Similar to KMS v1 but with improved performance and key management. A solid choice for third-party key management. Stable from Kubernetes v1.29. |
| secretbox | XSalsa20 and Poly1305 | Strong | Faster | 32-byte | Utilizes modern encryption technologies but may not comply with specific certifications like FIPS. |
Encryption for self-managed Kubernetes clusters
Let's take a look at a real example of setting up etcd encryption in a self-managed Kubernetes cluster with our own key:
Step 1: Generate a high entropy 32-byte key
openssl rand -base64 32
IPue+NtWYF2dnvKqlLTy2UXok2P+aiJ+eKuVuRd7wt0=
Step 2: Deploy the key on your Kubernetes cluster's master node
Note: Please make sure to use something like SSH (Secure Shell) to deploy the key to your Kubernetes node(s).
Create the following EncryptionConfiguration at path /etc/kubernetes/enc/enc.yaml on the control-plane node.
---
apiVersion: apiserver.config.k8s.io/v1
kind: EncryptionConfiguration
resources:
  - resources:
      - secrets
      - configmaps
      - pandas.awesome.bears.example
    providers:
      # Your encryption provider
      - secretbox:
          keys:
            - name: key1
              # Your 32-byte base64 key
              secret: IPue+NtWYF2dnvKqlLTy2UXok2P+aiJ+eKuVuRd7wt0=
      - identity: {} # This fallback allows reading unencrypted secrets;
                     # for example, during initial migration
Step 3: Use the encryption configuration file
Edit the manifest for the kube-apiserver static pod: /etc/kubernetes/manifests/kube-apiserver.yaml so that it is similar to:
---
#
# This is a fragment of a manifest for a static Pod.
# Check whether this is correct for your cluster and for your API server.
#
apiVersion: v1
kind: Pod
metadata:
  annotations:
    kubeadm.kubernetes.io/kube-apiserver.advertise-address.endpoint: 10.20.30.40:443
  creationTimestamp: null
  labels:
    app.kubernetes.io/component: kube-apiserver
    tier: control-plane
  name: kube-apiserver
  namespace: kube-system
spec:
  containers:
  - command:
    - kube-apiserver
    ...
    - --encryption-provider-config=/etc/kubernetes/enc/enc.yaml  # 👈 Path to your EncryptionConfiguration
    volumeMounts:
    ...
    - name: enc                           # Add this line
      mountPath: /etc/kubernetes/enc      # Add this line
      readOnly: true                      # Add this line
    ...
  volumes:
  ...
  - name: enc                             # Add this line
    hostPath:                             # Add this line
      path: /etc/kubernetes/enc           # Add this line
      type: DirectoryOrCreate             # Add this line
  ...
Step 4: Restart your Kube API server
For more information about verifying that secrets are actually encrypted with the new key, rotating keys, and preventing plaintext secret retrieval, please explore the official Kubernetes Docs.
Managed Kubernetes cluster using cloud-provider KMS
Here are some examples of how we can encrypt secrets in etcd in a managed Kubernetes cluster by leveraging the KMS from cloud providers.
AWS EKS (Elastic Kubernetes Service)
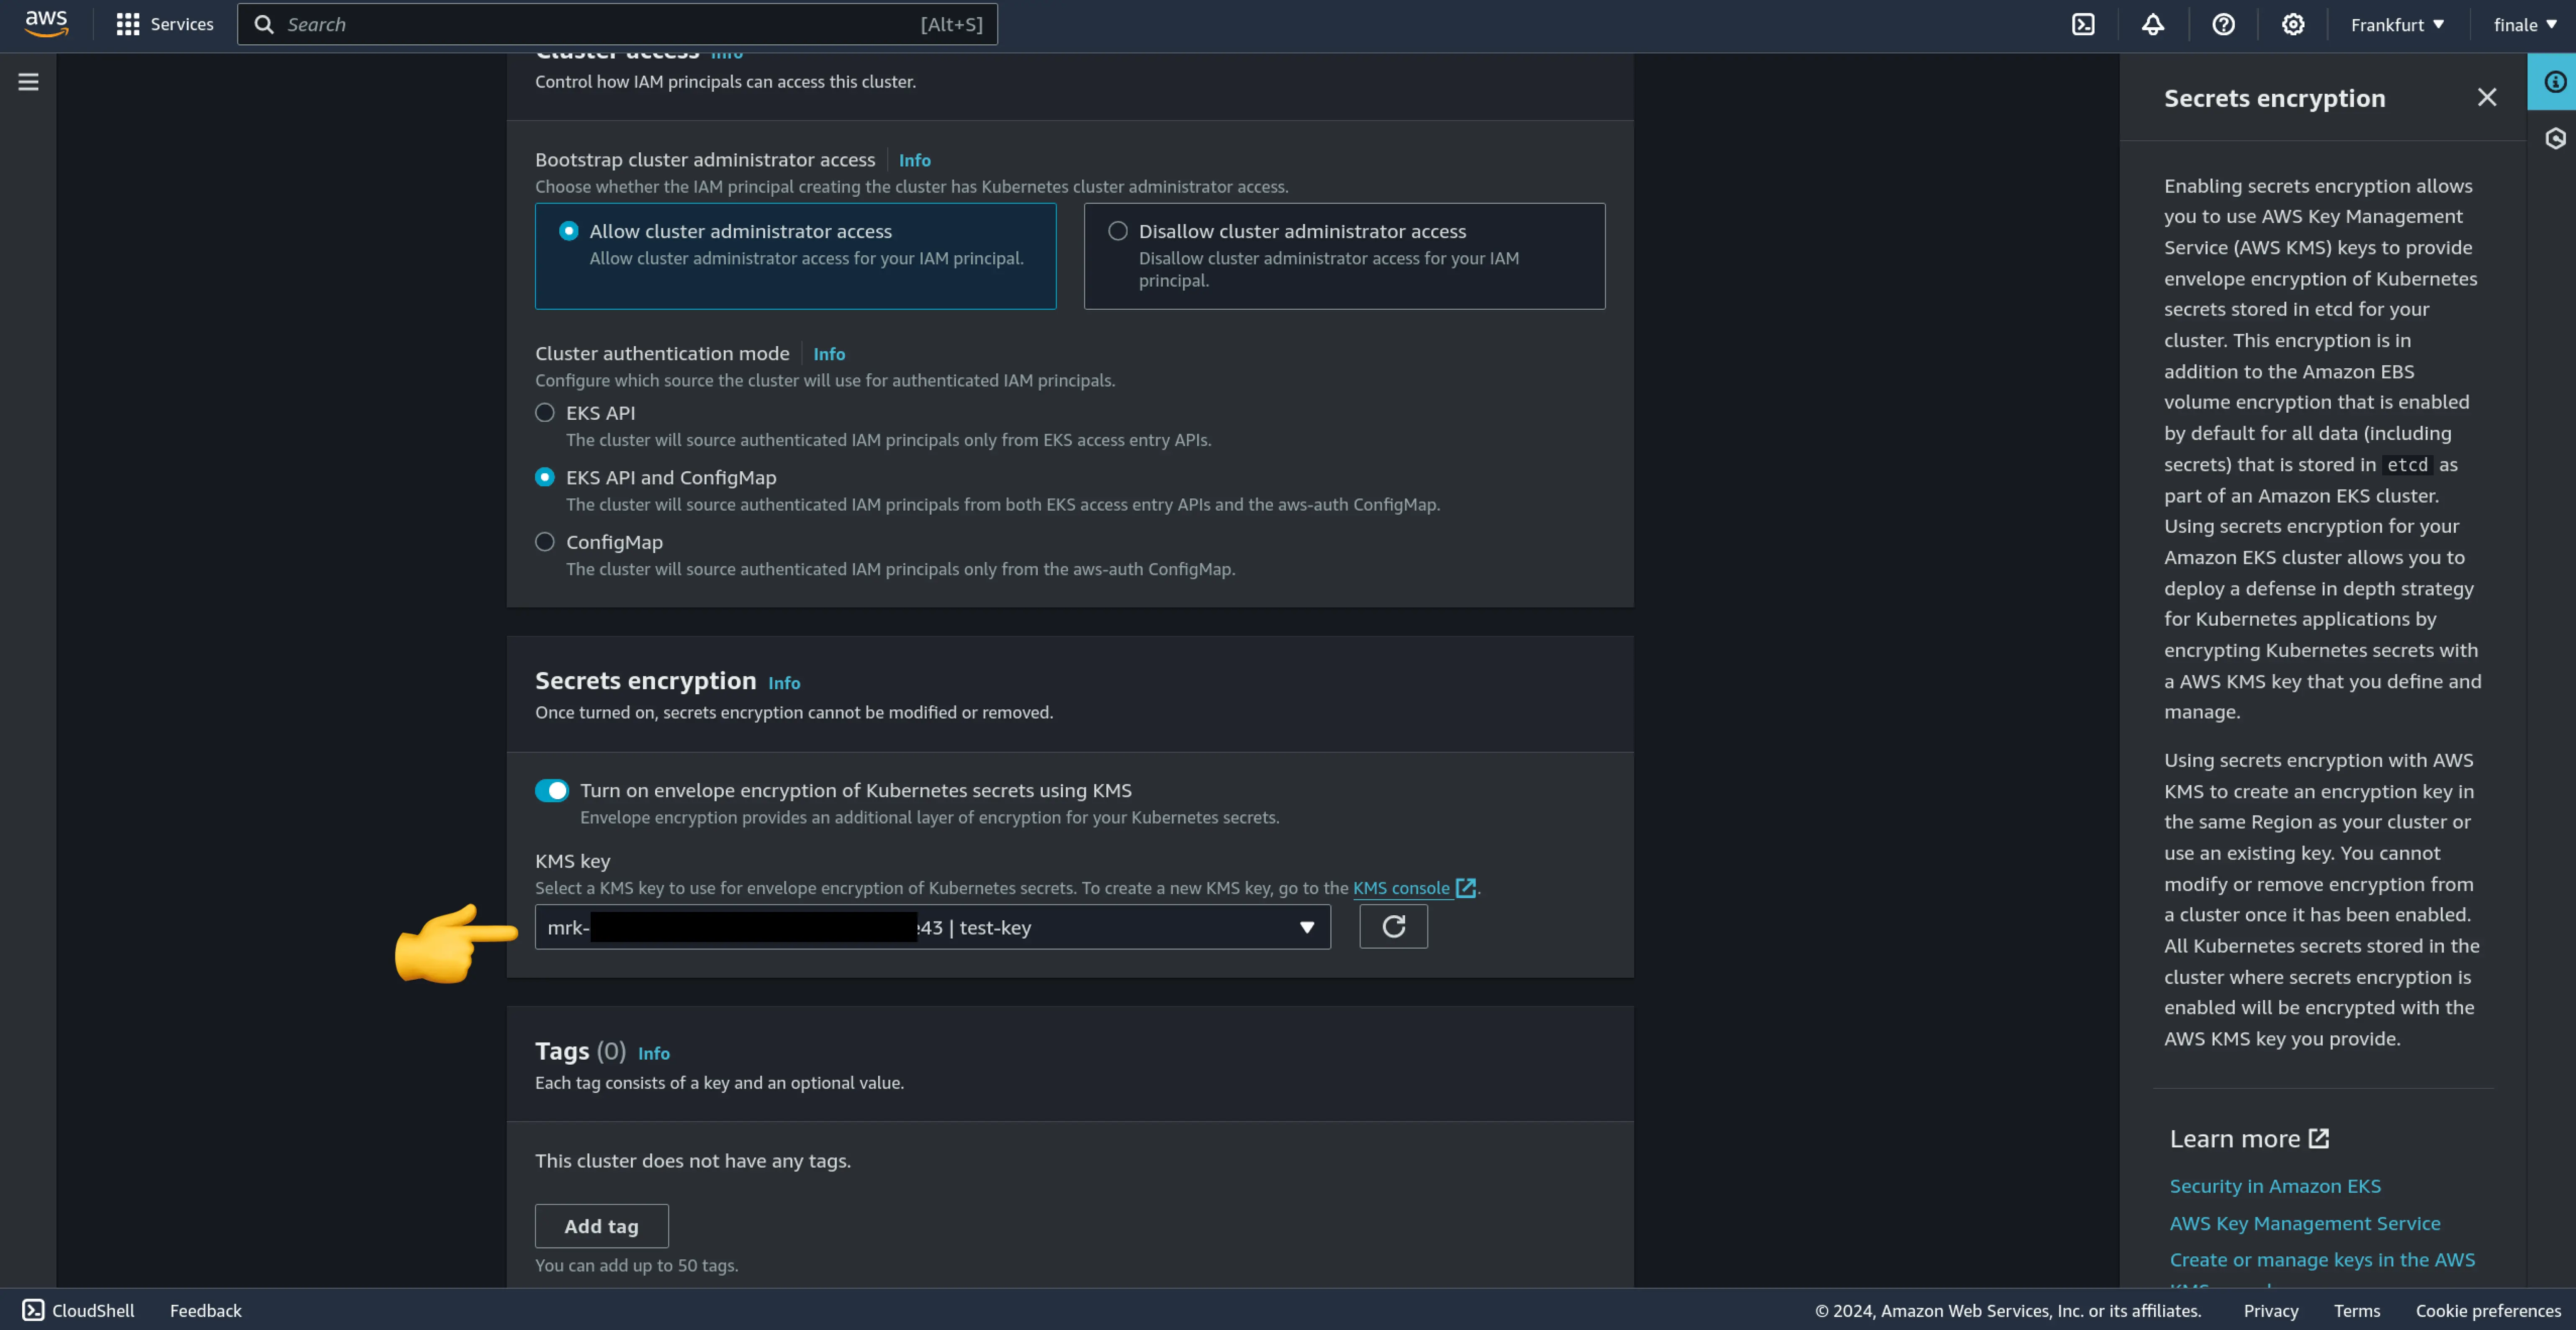
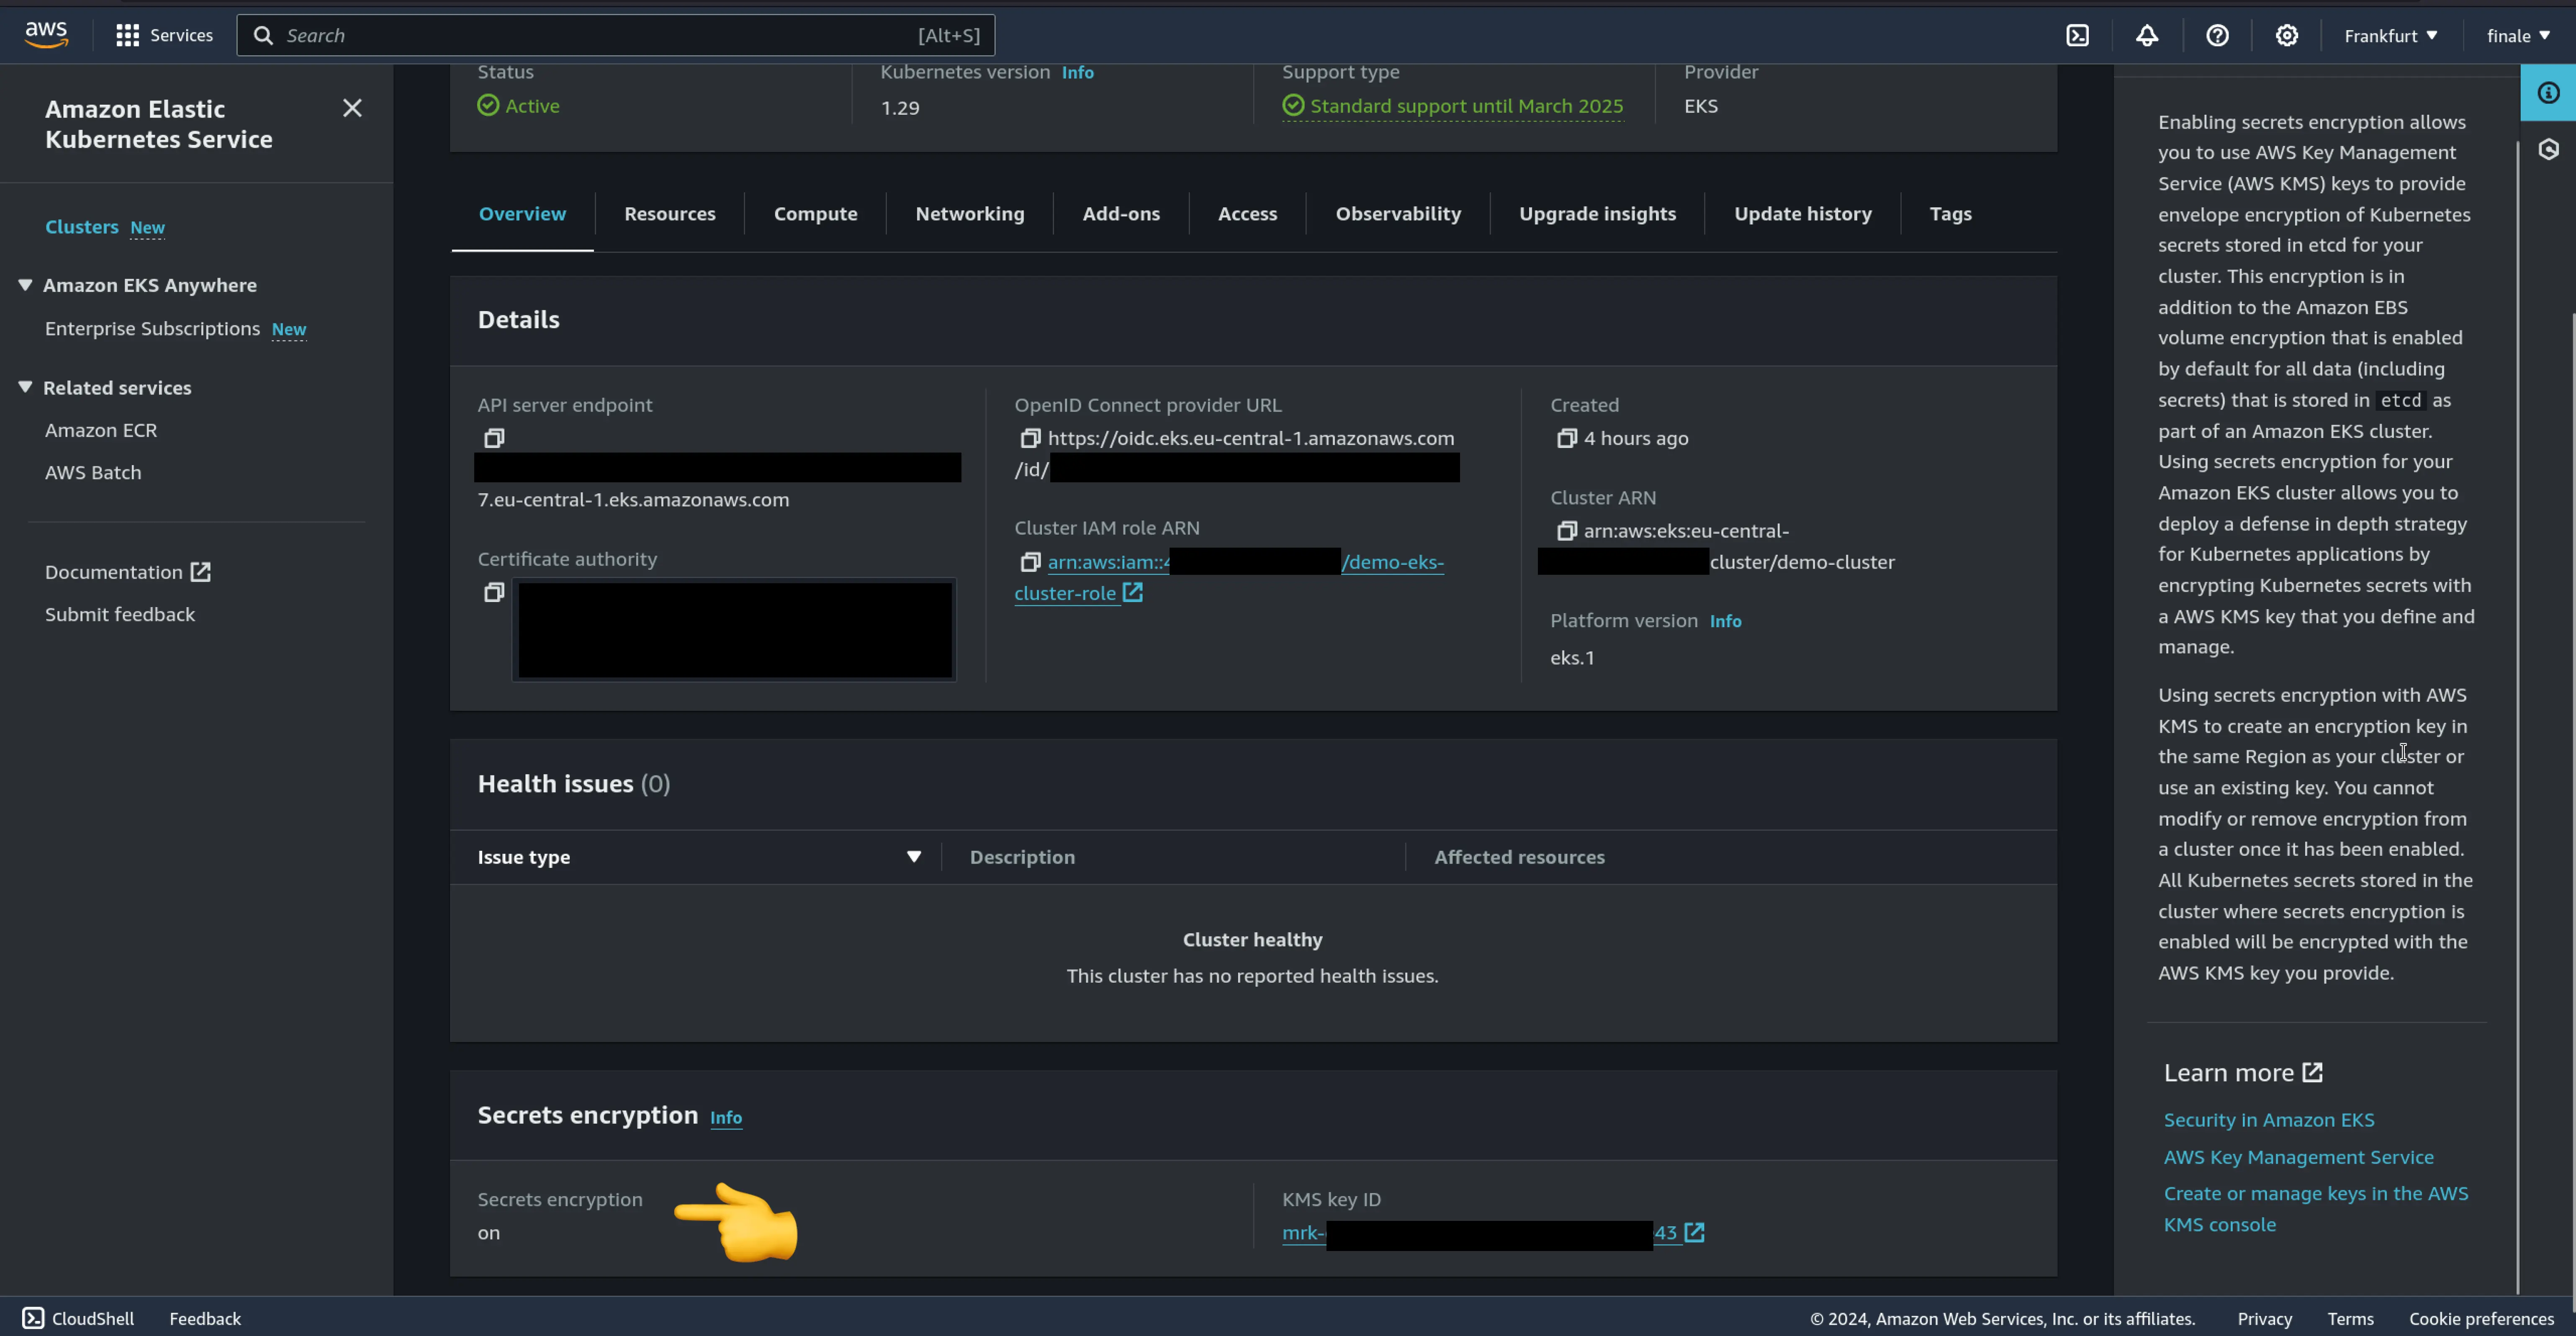
AWS offers an integrated key management solution, simplifying the use of encryption providers and ensuring secure key handling. By default, this uses an AWS-managed key to encrypt etcd data but allows using a CMK (Customer Managed Keys) via AWS KMS.
GCP GKE (Google Kubernetes Engine)
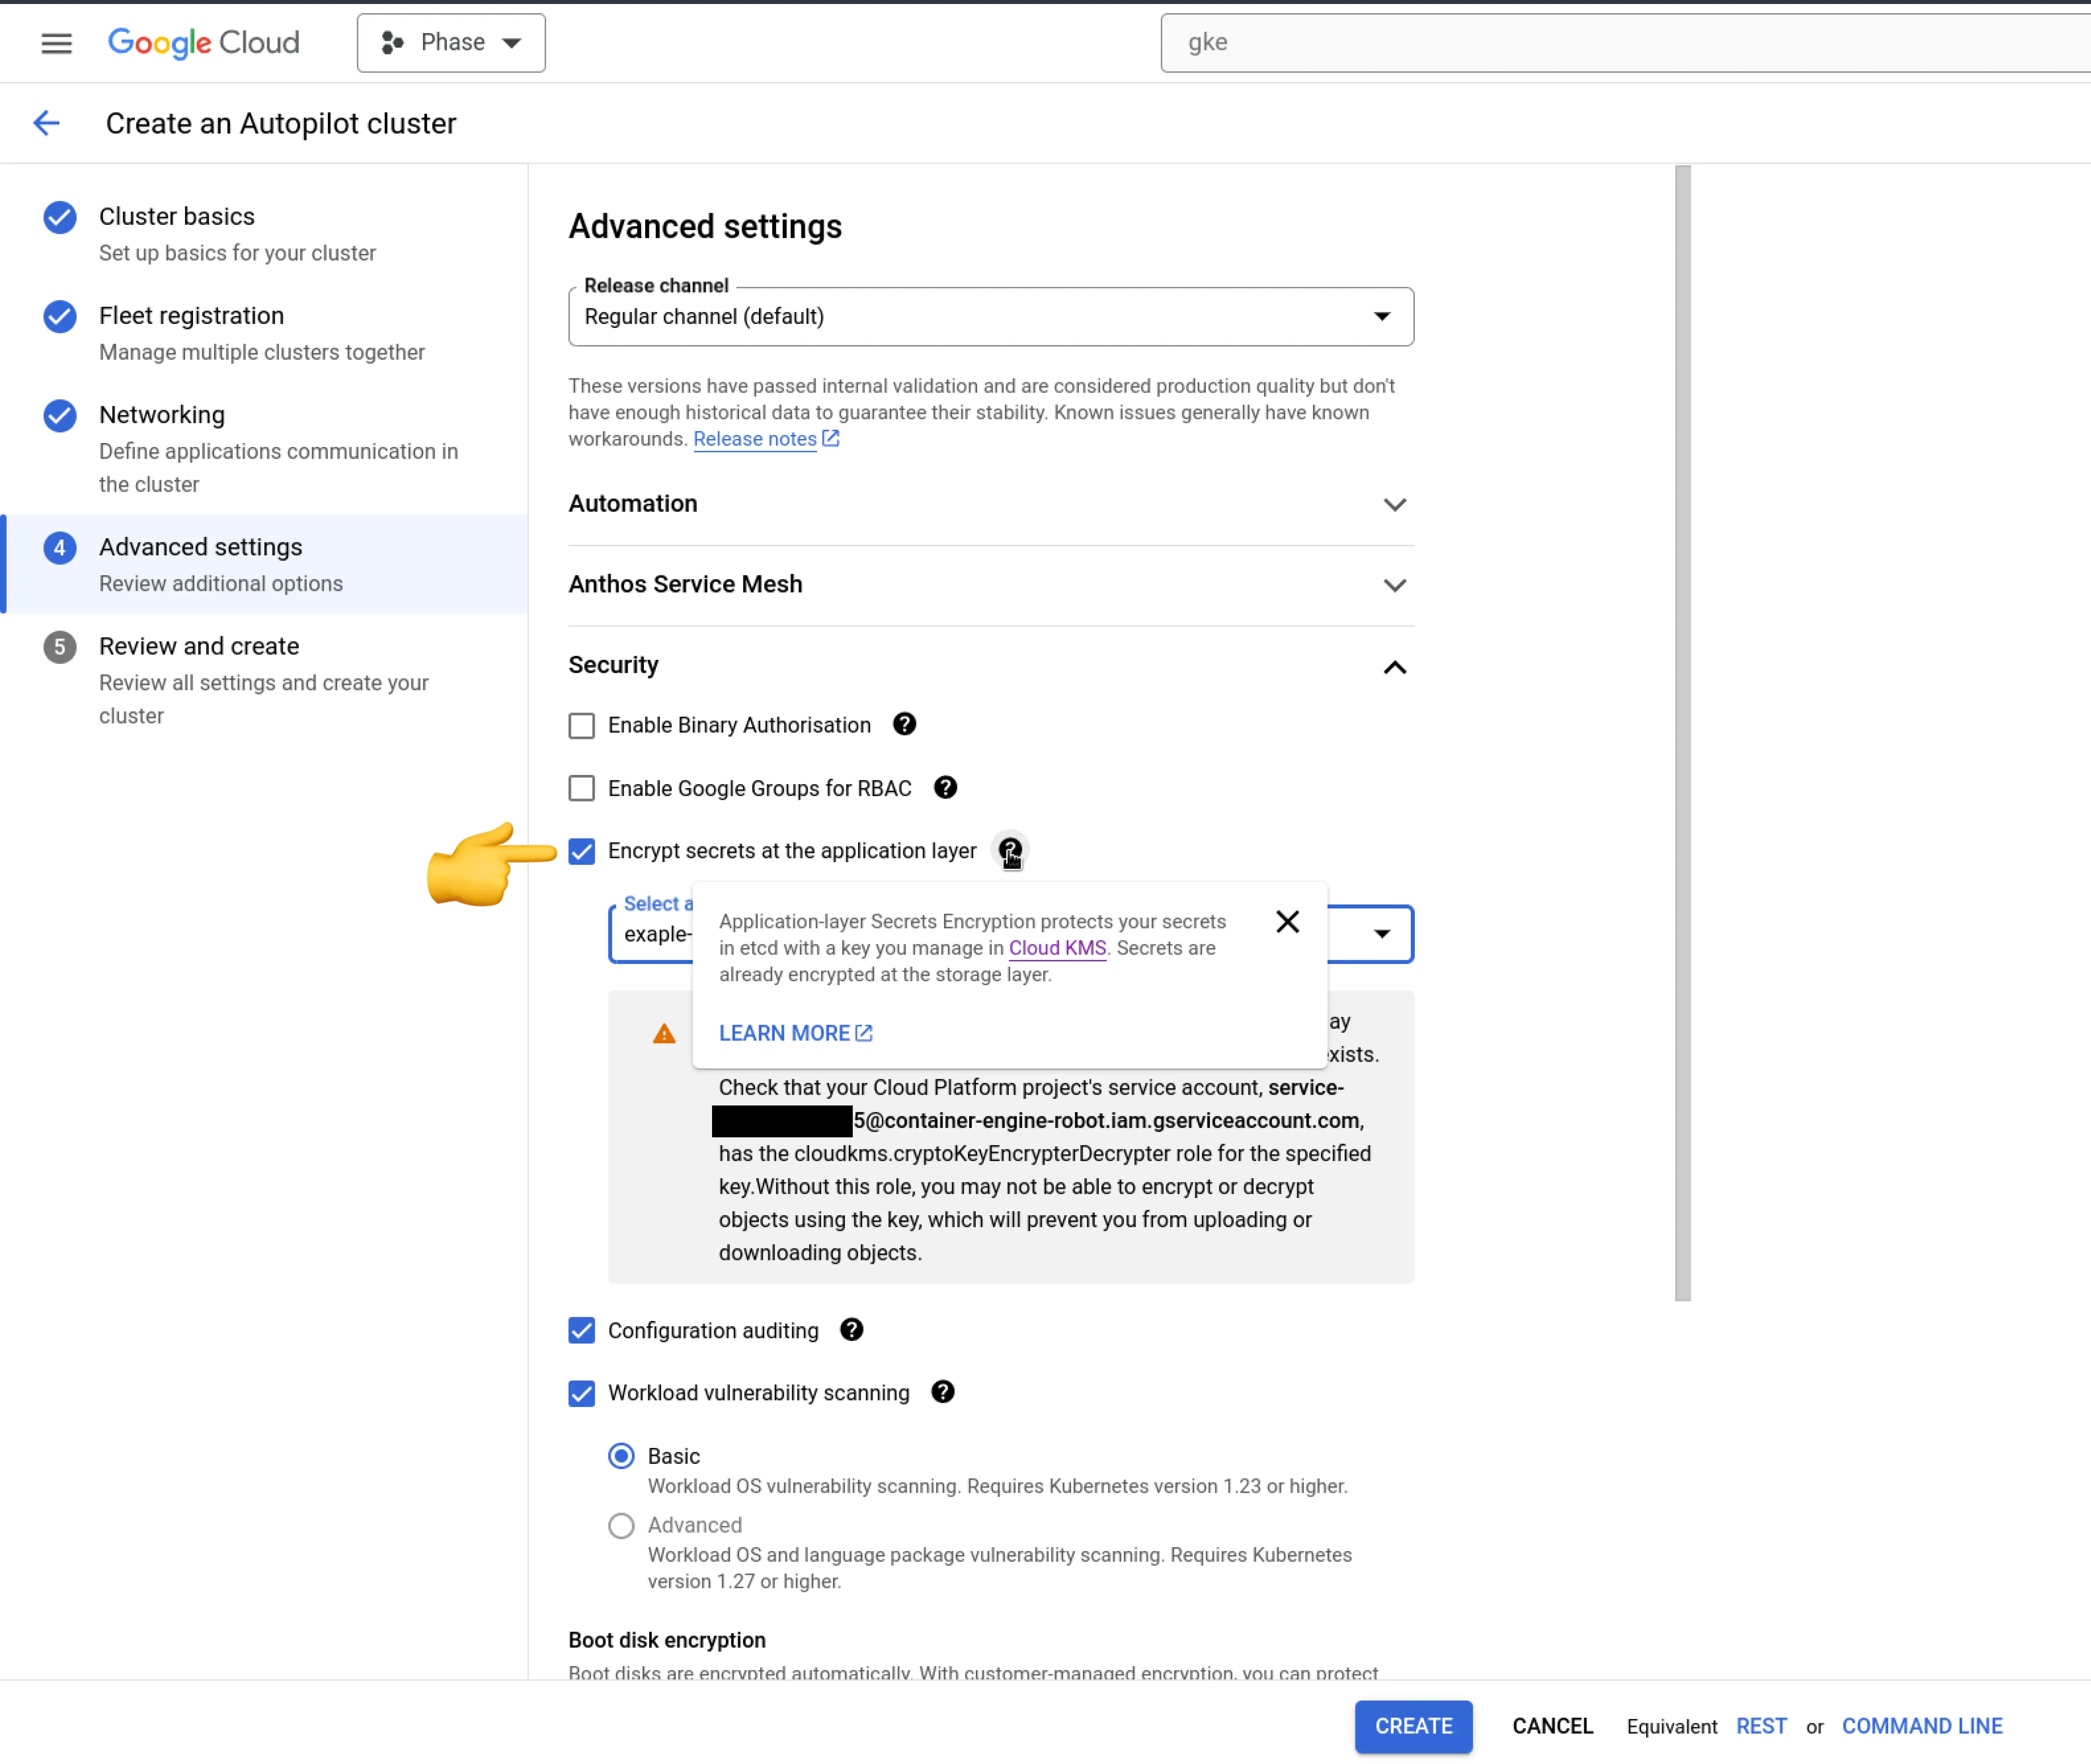
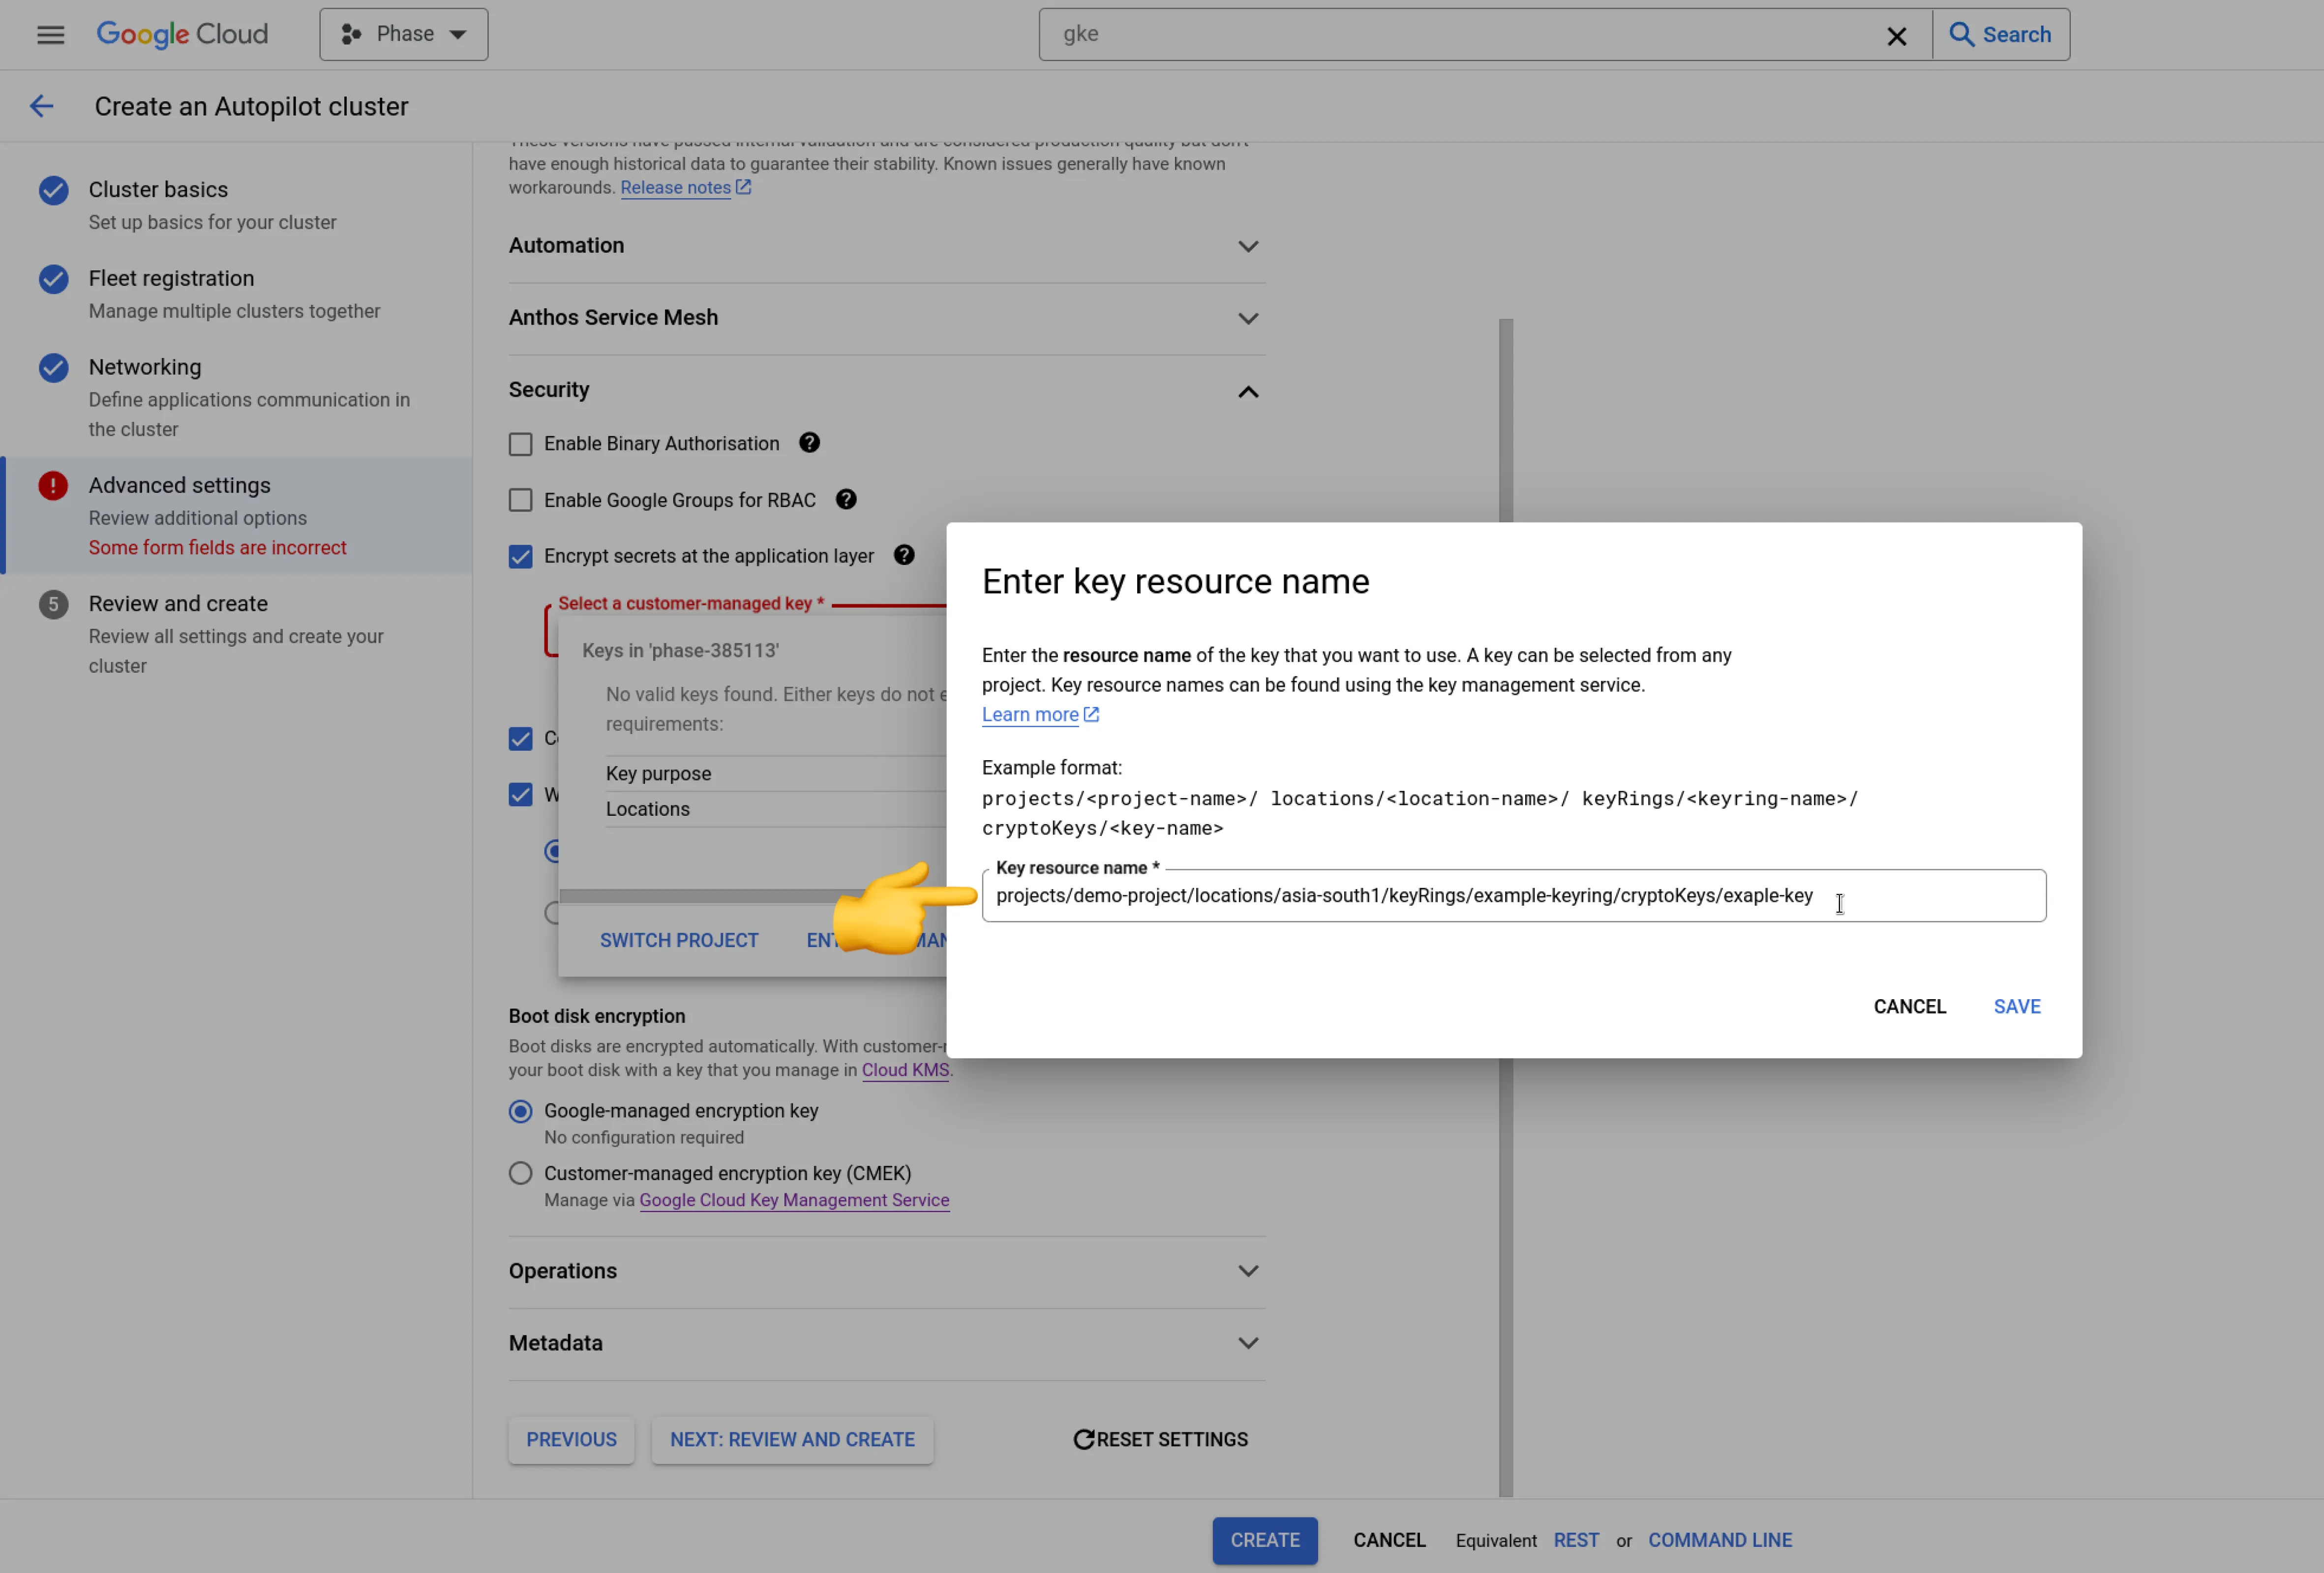
GCP similarly provides an integrated environment for secure secret management. Make sure to ✅ check 'Encrypt secrets at the application layer'.
Azure AKS (Azure Kubernetes Service)
Azure provides instructions on using Azure Key Management service with AKS. Read Add Key Management Service etcd encryption to an Azure Kubernetes Service cluster
Sync secrets to Kubernetes
Next, let's move on to the fun part — actually deploying secrets!
1. Install the Phase Kubernetes Operator via Helm
Add the Phase helm repo and update it:
helm repo add phase https://helm.phase.dev && helm repo update
Let's install version v1.2.0:
helm install phase-secrets-operator phase/phase-kubernetes-operator --set image.tag=v1.2.0
You can find the available versions on our GitHub releases page.
2. Create a Service Token Secret in Kubernetes
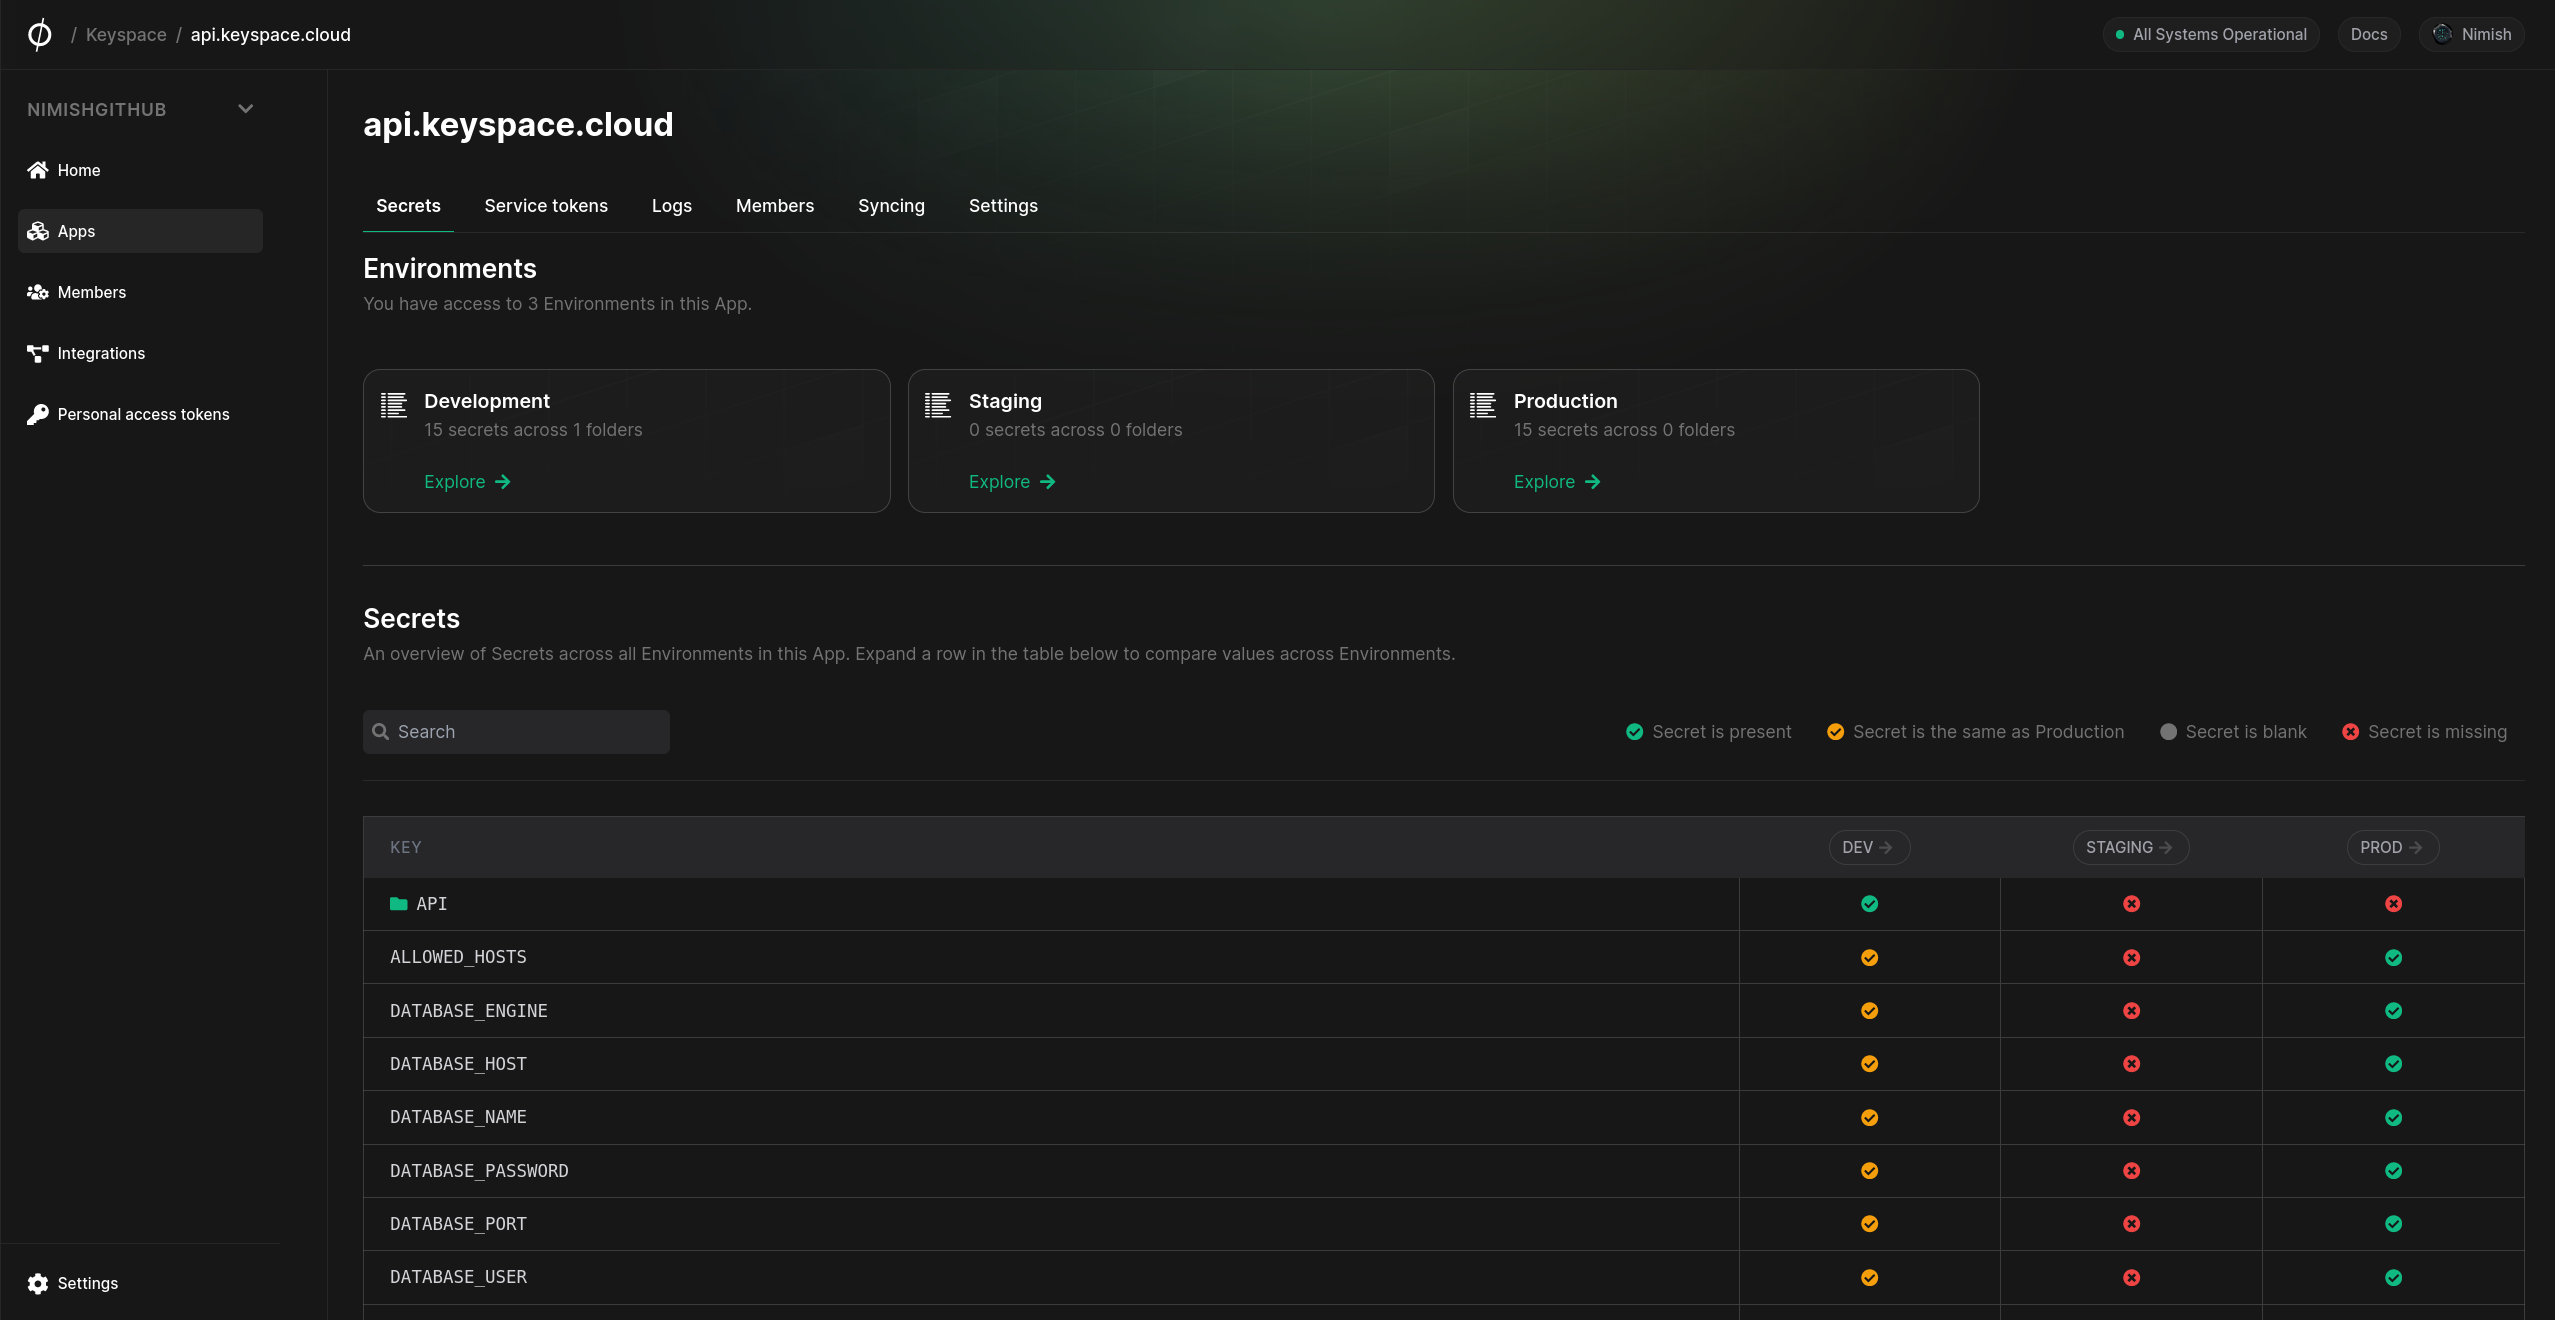
We need to create a Phase Service Token so that the operator can authenticate with the Phase Service and fetch secrets. Head on over to the Phase Console > Apps > Your application > Service tokens and create a token.
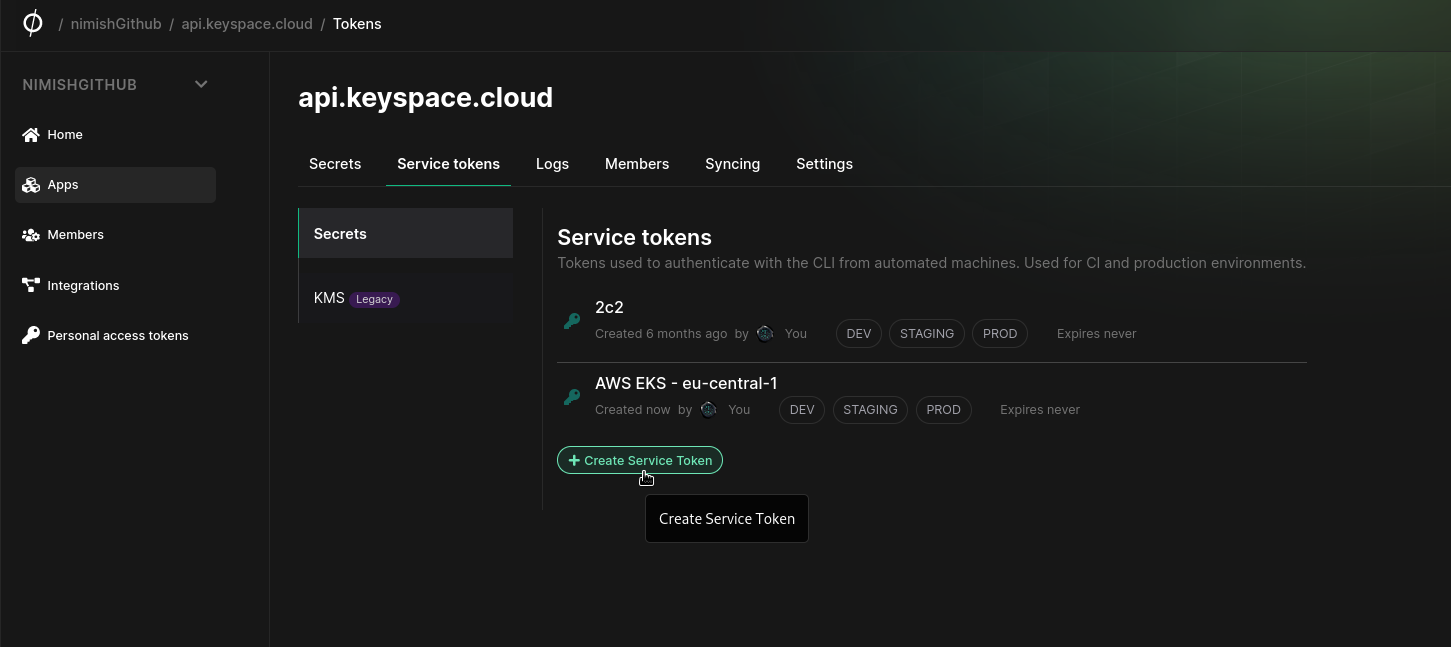
Check out the Phase Docs for information on creating Service Tokens.
Creating a Service Token Secret securely via kubectl is vital. You can do this using the read command, which is recommended as it avoids writing the token to disk or shell history:
read -s TOKEN
kubectl create secret generic phase-service-token \
  --from-literal=token=$TOKEN \
  --type=Opaque \
  --namespace=default
unset TOKEN
Alternatively, you can simply pass the Token inline:
kubectl create secret generic phase-service-token \
  --from-literal=token=<TOKEN> \
  --type=Opaque \
  --namespace=default
3. Deploy the Phase Secrets Operator CR (Custom Resource)
Create a custom resource file named phase-secrets-operator-cr.yaml. This file will define how the Phase Secrets Operator should manage your secrets. Below is a basic example of how to sync all secrets from path / in production environment in an app in the Phase Console to your Kubernetes cluster:
apiVersion: secrets.phase.dev/v1alpha1
kind: PhaseSecret
metadata:
  name: keyspace-cloud-phase-secret
  namespace: default
spec:
  phaseApp: 'keyspace.cloud' # The name of your Phase application
  phaseAppEnv: 'production' # The Phase App Environment to fetch secrets from
  phaseAppEnvPath: '/' # Path within the Phase application environment to fetch secrets from
  phaseHost: 'https://console.phase.dev' # OPTIONAL - URL of a Phase Console instance
  authentication:
    serviceToken:
      serviceTokenSecretReference:
        secretName: 'phase-service-token' # Name of the Phase Service Token with access to your application
        secretNamespace: 'default'
  managedSecretReferences:
    - secretName: 'keyspace-cloud-prod-secret' # Name of the Kubernetes managed secret that Phase will sync
      secretNamespace: 'default'
Apply the custom resource:
kubectl apply -f phase-secrets-operator-cr.yaml
Watch for secrets being created:
watch kubectl get secrets
Set up RBAC (Role Based Access Control) and update deployment
Now that our secrets are deployed to Kubernetes we need to control access to them via Kubernetes RBAC policy for additional security.
1. Setup a RBAC policy for accessing secrets
First, let's set up an RBAC policy with a custom role (Role) for our deployment:
apiVersion: rbac.authorization.k8s.io/v1
kind: Role
metadata:
  namespace: default
  name: secret-reader
rules:
- apiGroups: [""]
  resources: ["secrets"]
  resourceNames: ["keyspace-cloud-prod-secret"]
  verbs: ["get", "watch", "list"]
This Role named secret-reader allows reading the secret named keyspace-cloud-prod-secret in the default namespace and grants the following permissions: get, watch, list.
2. Create a Service Account for your Application
Let's create a Kubernetes Service Account (ServiceAccount) for our deployment. This will be used by each pod of our application.
apiVersion: v1
kind: ServiceAccount
metadata:
  name: keyspace-app-service-account
  namespace: default
3. Bind the Role to the Service Account
Next, create a RoleBinding to grant the secret-reader role to the keyspace-app-service-account:
apiVersion: rbac.authorization.k8s.io/v1
kind: RoleBinding
metadata:
  name: read-secret-to-my-app
  namespace: default
subjects:
- kind: ServiceAccount
  name: keyspace-app-service-account
  namespace: default
roleRef:
  kind: Role
  name: secret-reader
  apiGroup: rbac.authorization.k8s.io
This RoleBinding named read-secret-to-my-app connects the secret-reader role with the keyspace-app-service-account, allowing the associated pods to access the keyspace-cloud-prod-secret.
4. Update Your Deployment to Use the Service Account
Modify your deployment to use the keyspace-app-service-account:
apiVersion: apps/v1
kind: Deployment
metadata:
  name: keyspace-cloud-app-deployment
  annotations:
    secrets.phase.dev/redeploy: 'true' # 👈 Automatically redeploy my application after secret changed
spec:
  replicas: 3
  selector:
    matchLabels:
      app: my-app
  template:
    metadata:
      labels:
        app: my-app
    spec:
      serviceAccountName: keyspace-app-service-account # 👈 Service account we just created
      containers:
        - name: my-app
          image: my-app-image
          envFrom:
            - secretRef:
                name: keyspace-cloud-prod-secret # 👈 Application secret
In this deployment, the spec.serviceAccountName field is set to keyspace-app-service-account, ensuring that the pods run with the permissions granted to the service account, and thereby, adhere to the principles defined in the Role and RoleBinding.
By setting up these RBAC policies, you ensure that only your application has the necessary access to the secrets it needs, adhering to best practices for security and access control in Kubernetes.